


I recently finished up these fabulous Greek key pillows for my master bedroom.

I am in the process of redecorating my master, and I fell in love with this sweet little floral pillow from TJ Maxx. I loved the water color flowers, but I couldn’t find any thing to match it 🙁

Finally I came across this tutorial by Sarah M. Dorsey Designs. I thought it would be the perfect geometric compliment to my feminine floral pillows.
Sarah really did all the hard work and came up with a genius way of making the Greek key pattern using painters tape! (We’ll get to that in a minute.)
I followed her tutorial pretty closely, but had to adjust the measurements since I was making a Euro size pillow (26″ square). Also, I decided to sew my trim on instead of ironing it. I tried the ironing method but ended up having an epic fail 🙁
Here is how it finally came together…
I cut 3 pieces of fabric (measurements below)… 1 green, and 2 white. The green will be the pillow front and the 2 white pieces will be the envelope closure on back.
Each white piece will need to have one finished edge (hem). I cut my pieces from and old curtain so the edges were already finished, but if you are using plain old fabric you can create a finished edge quite simply. Just fold down one long edge 1/4 inch. Press. Fold down 1/4 inch again. Press and sew.

*Note- when I am sewing pillows, I like to cut the pieces to the same measurements as the actual pillow. So since my pillow was 26″ x 26″ I cut my fabric to this same width. I have found that when I add extra inches (to allow for seam allowances) the pillow cover ends up being too loose. By cutting it the same width as the actual pillow, you end up with a sham that is slightly smaller than your insert. This makes for a nice full and fluffy look!
Now let’s talk about the trim for a minute. I used 4.5 yards of continuous 1″ wide 100% cotton twill tape. You can find it at Joann’s or Hancock. It comes on large plastic spools and looks like this….

Now don’t be fooled by this polyester twill…

I originally purchased this polyester kind thinking it wouldn’t make that much of a difference. Let me just tell you that it was an epic fail! I couldn’t get crisp corners and once I finally had it ironed it looked cheap and transparent.
So save yourself the headache and go with the 100% cotton. The cotton comes in various widths. I like the way the 1″ trim looks on my large pillow, but if you are making a smaller pillow I would suggest going with the 1/2″ trim.
OK, back to the pillow. First I took my green piece of fabric and laid out my painters tape. The tape is just a guide to help you with your placement of the trim.
Here is how I laid out my painters tape for my 26″ square pillow…

If you own a quilting ruler, it makes laying out the tape super simple.

Once the tape is all laid out you can start pinning your trim. Check out Sarah’s tutorial here for a clear diagram of how she did it for her 20″ pillow. I made a similar diagram below, but I forgot to take a picture with the blue tape still on….

When you get to a corner, fold the trim completely back on itself then fold going the new direction. This will keep your corners nice and pretty.
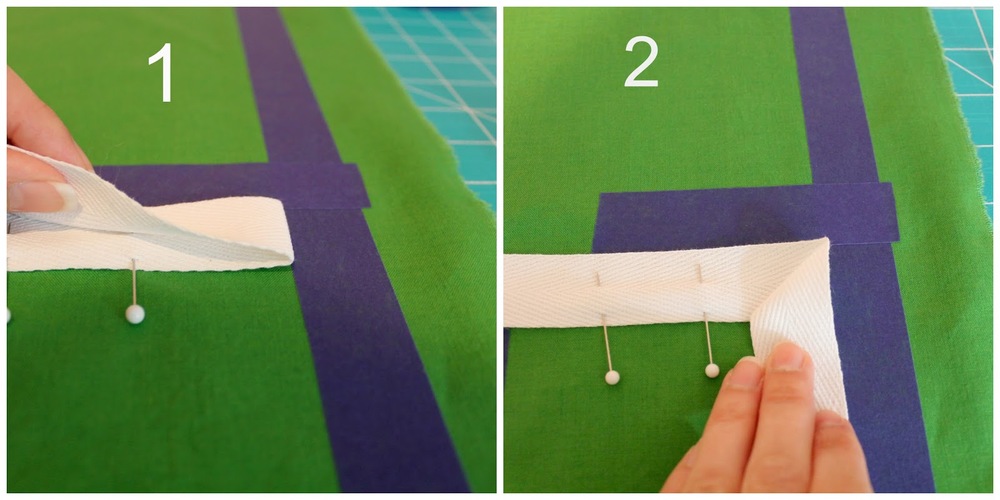
Here is a close up of the pinned corner…

Once everything is pinned, sew down your white trim, remove the blue tape and voila!

Next make your envelope closure by placing your two back pieces as follows… with right sides together.


Pin around the entire perimeter and sew around all four sides.
Here is a close up of the back side. Once finished sewing all four sides, I used pinking sheers to prevent fraying. I also clipped the corners to cut down on bulk.

Turn your pillow right side out. Press well. Stuff it with your insert and your done!


Here is a shot of the envelope closure in back.

And what photo shoot would be complete with out a photo bomb?

Once I figured out the trick about the cotton trim, it really was not that difficult! Please feel free to comment if you have any questions.
Happy Sewing!
Linking up…


view + leave comments . . .